With the increase in popularity of cryptocurrencies and blockchain technologies, now a global phenomenon, many investors include them as part of their investment portfolios. Non-Fungible Tokens have also increased in their prominence.
We have previously discussed what NFTs are: one-off tokens built on blockchain tech, representing various rare and unique items in both the virtual and real worlds, such as digital art, virtual real estate, and collectibles like sports cards.
Many investors, traders, and collectors have both earned and lost a lot of money with NFTs–and with the stories seen in the media on a regular basis, creators and other artists are now making money from this new digital media. Its growing popularity is prompting many to wonder how they can create NFTs and join this ever-increasing club of digital artists.
This article discusses the benefits NFTs provide to an artist, answers some questions about the space, and gives you a simple guide to produce an NFT of your own.
Why Create an NFT?
Historically, artists have sold works and have not been the beneficiaries of any future appreciation. However, NFT art is different. Artists can gain from the creation of NFTs in three specific ways.
A Less Expensive Global Market. Because NFT art sales are generally conducted online via peer-to-peer marketplaces, an artist does not have to spend money for an auction house or a gallery.
Lifelong Royalties. NFTs can be coded so that the original artist not only makes money when they sell their digital art the first time, but they can keep earning with each subsequent sale of the token. This is generally a rate of between 2.5-10% of the next sale’s price, giving the artist a lifelong source of revenue.
An Authentic Verifiable Chain of Provenance. Though NFTs are famous for being “right-clicked saved as,” the valid owner of the art is the token holder at the time. Once part of the blockchain, this digital ownership certificate is considered authentic. The current owner, their acquisition price, as well as the previous owners and prices paid, are known. This results in market transparency not seen in the art world before.
Making an NFT, Step-by-Step
Creating an NFT now only involves a few steps, with the main part of the creation process done through a marketplace.
- Select an NFT Marketplace
There are generally two types of marketplaces that you can use to create your artwork in NFT form.
Curated. This type of marketplace only allows authorized artists to create (or mint) their digital tokens. Curated marketplaces will focus on high-quality art, not simple low-quality collectibles. NFTcalendar.io is a famous curated NFT marketplace. Their transaction fees are higher, and the royalty percentage on secondary market transactions that can be programmed into the artwork is lower as well (usually a maximum of 5%).
Self Service. The more popular is self-service, or peer-to-peer marketplaces allowing any artist access to create NFTs with whatever they like. Artists can create a token with an image, video, or audio file, and set the royalty percentage as they wish. Unfortunately, being open, there are imitators and fraudsters that will use similar images and art to gain from a famous self-service platform artist.
OpenSea.io is the most popular marketplace for NFTs. OpenSea has risen to popularity, becoming the largest platform, because of its ease of NFT creation and extensive catalog.
Rarible.com is another self-service NFT platform. There are several to choose from.
Once your desired platform is chosen, you will need to open an account on that platform. We will be using Opensea.io for our choice, but the specifics for others are very similar.
- Create a Digital Wallet
You must start by setting up a digital wallet that will store your cryptocurrency and your NFTs. In most cases, you will have to choose ETH, the native token for Ethereum, but other cryptos can be selected for some platforms. ETH is the only choice for the NFT creation process on OpenSea.io and has the most buyers and sellers of NFTs on any platform.
It helps if you already own some ETH because NFTs created on the Ethereum Blockchain will use ETH to pay for the “gas” (read: transaction) fee needed to list the token you create.
Opensea.io recommends using the MetaMask cryptocurrency wallet extension for the Google Chrome browser. With this wallet/extension, you can purchase a sufficient amount of ETH needed to mint your NFTs.
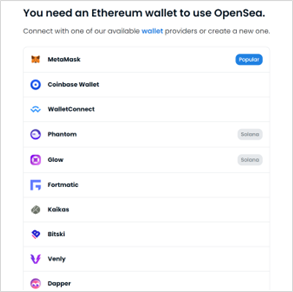
If you already have another supported crypto wallet with ETH, you can use it, or create a Metamask wallet and transfer it to the Metamask wallet. The gas fees will range from $15 to $200 in ETH.
- Build your Digital Collection
You are not quite creating the NFTs yet. On the interface of your OpenSea account, there will be a MyCollections tab. This is where you store your gallery of digital art.
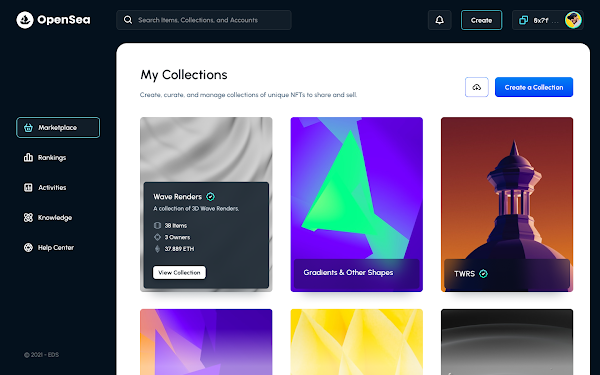
You will need to customize each collection, entering a name, writing a description, and then uploading a display image. This is the foundation for displaying your artwork once you have created them.
- Create Your Token
Once your collection is finalized, you will begin the process of creating an NFT. Start by clicking “Add New Item” to your collection. The following will appear.
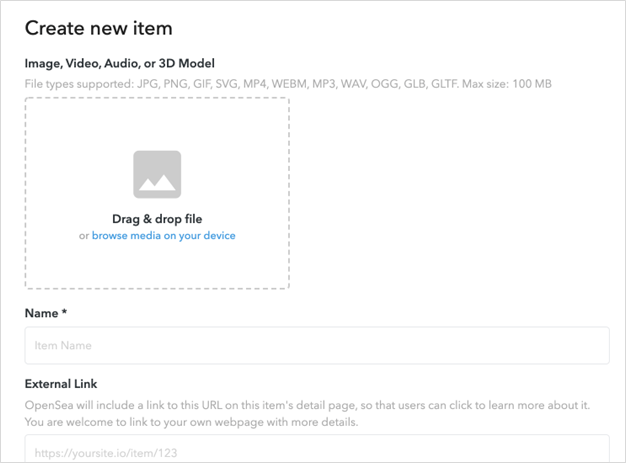
You can see that several types of digital media can be uploaded: images (JPG, PNG, GIF), Audio (MP3s), and 3D files (GLB), with a max size of 100MB. You will then supply a name for the token.
You can choose to mint an infinite number of tokens, but they must be done one at a time. You should note how many editions of that token you wish to mint as well.
Editions. This is a token with multiple copies of the same digital media. You will have edition numbers that differentiate the tokens. For example, #1 of 500 would generally be more desirable than #346 of 500.
Stand Alone. This is a one-of-a-kind token.
You then add properties (date created, etc.), levels, and relevant stats, which will enable potential buyers who are exploring your collection to filter the artwork, including social links, an image, an art description, and a name. Once complete, you will click “Create” to add this NFT to the blockchain. This is where you will need your ETH to pay for the gas fees.
From here, you can choose the payment tokens you will accept for your new NFT, and you will also designate the percentage of royalty you receive for any subsequent purchases.
- List for Sale
Now that your NFT has been created, list it for sale. Sales can be earned either through an auction or a fixed price listing. If this is your first time selling an NFT, you will have to pre-pay for the gas fee.
- Promote Your NFT
The final step is to promote your NFT. Sellers who don’t promote will not get a good price for their art, and you need to think of this as a business. Sellers with a substantial fan base do better. Therefore, you should share your direct link to any potential buyers through your fans on social media.
No Coding Experience Necessary
With the tools discussed previously, you don’t need to have any coding knowledge to create an NFT. You can easily create one with OpenSea in just a few minutes. They have experience helping beginners and will set you on the right path to the successful creation of your first NFT. If you can use the internet, you are likely skilled enough to make an NFT with their step-by-step process.
Are NFTs and Cryptocurrencies the Same?
No, they are not the same, but they are cousins. NFTs and cryptocurrencies are digital tokens. However, NFTs are one-offs, all completely different and not interchangeable; one piece of art is not the same as another, even if they are numbered copies. A cryptocurrency token is the same and has the same value as every other cryptocurrency of the same type. A bitcoin is a bitcoin, like a dollar is a dollar.
What Risks do NFTs Have?
Significant Speculation. NFTs have as much or more volatility as cryptocurrencies. They are highly speculative and can both produce and eviscerate profits in short order. There is a risk of losing funds with hyped, and pump and dump NFTs.
High Gas Fees. The rates for gas fees can change drastically on the Ethereum blockchain. This has an effect on the NFT’s price. Exorbitant fees can cause the NFT’s value to decrease, losing buyers and resulting in losses for the creator.
Competitive Market. There are many artists on the larger platforms, and your artwork may be hidden among the abundance of choices. This is why a solid social media presence can move you to the forefront, leading to profits from NFT sales.
Summary
Being a new market, NFTs have significant potential for growth. However, they also come with a familiar amount of risk and volatility.
The market has grown significantly over the past few years and is becoming more established with the NBA and many other organizations embracing NFTs, but it may be a while before the volatility reduces. If you are going to create a series of NFTs, watch the gas fees and make sure that your social media marketing behind them is already in place so you have the most success.
Disclaimer: The author of this text, Jean Chalopin, is a global business leader with a background encompassing banking, biotech, and entertainment. Mr. Chalopin is Chairman of Deltec International Group, www.deltecbank.com.
The co-author of this text, Robin Trehan, has a bachelor’s degree in economics, a master’s in international business and finance, and an MBA in electronic business. Mr. Trehan is a Senior VP at Deltec International Group, www.deltecbank.com.
The views, thoughts, and opinions expressed in this text are solely the views of the authors, and do not necessarily reflect those of Deltec International Group, its subsidiaries, and/or its employees. This information should not be interpreted as an endorsement of cryptocurrency or any specific provider, service or offering. It is not a recommendation to trade.
One thought on “How To Create An NFT: A Step By Step Guide”
Comments are closed.